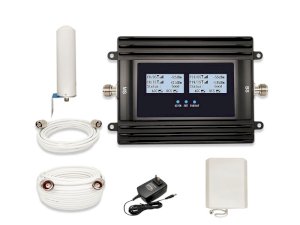
Many people are afraid to buy signal boosters because they have never seen any similar devices before and are not sure that they can install them on their own. However, in reality, the installation itself is much easier than you can imagine. Though, this process includes several steps all of them can be performed without any professional help. We’ve prepared this article to help you install all the elements of your repeater just within 15-20 minutes. We advise you to read this text attentively as the correct installation is one of the conditions for efficient booster functioning.

We can break the entire process down into 5 key steps.
- Step 1. Find the most appropriate location for the outdoor antenna.
- Step 2. Install the outdoor antenna.
- Step 3. Connect it to the booster box.
- Step 4. Install the indoor antenna.
- Step 5. Switch on the device.
The boosters that are available today may have a little bit different configurations. For example, some models have directional outdoor antennas, while some others have omnidirectional antennas. However, in any case, an outdoor antenna should be placed on the roof (or at least near the window outdoors) which means that you may need a ladder to climb onto the roof of your house to fix the antenna. So, you should be ready for that but in the general, the process of installation does not require any special preparations.
mobile signal booster LCD-300GD
+ FREE Lightning Surge Protector
for United States
4.9/5 — 278 Reviews
Find the most appropriate location for the outdoor antenna.
As we’ve already mentioned, you need to start with defining the best place for fixing the antenna that is responsible for catching the signal transmitted by your operator. That is the most important step of the entire process. The easiest way to find this location is to walk around the perimeter of the building with a smartphone and monitor the number of bars or track the results in one of the available mobile apps intended for measuring the signal power. Or you can also use the Field test mode for better results.
Install the outdoor antenna.
When the place is detected, it’s time to mount the antenna. We recommend placing an antenna as high as possible in the zone with the best signal reception. The best location is on or near the edge of the roof. If your signal booster has a directional antenna, your antenna should be directed to the side where the nearest cell tower is located.

Connect it to the booster box.
When the antenna is installed, you need to take a coaxial cable that is included in the booster set and connect the antenna with a booster box. You can run the cable into the attic or you can use a window entry cable.

Install the indoor antenna.
As for indoor antennas, there are usually not so many requirements. However, it is important to ensure at least a 10-meter vertical distance between your already installed outdoor antenna and the indoor antenna in order to prevent technical errors that will result in situations when your booster will be automatically turned off. Also, please pay attention to the fact that there can be different indoor antennas, for example, wall or ceiling ones.

Switch on the device.
Now when everything is ready, it’s a good moment for plugging in a power supply to the power outlet and to your mobile signal booster. Just in a couple of seconds, your device will start working and you will have the possibility to enjoy the boosted signal within the entire coverage area of the device!

If you haven’t found your ideal booster yet, we recommend you have a look at the models presented in our online catalog. We highly value our clients and offer only the most powerful and efficient devices. We guarantee the best quality of our boosters and the most attractive prices. A 3-year warranty is proof of our confidence in our products. Do not hesitate to contact our team if you have any questions!


